
Why Waves Fall Apart and Frizz Throughout the Day
You know the feeling: you leave the bathroom in the morning with waves that hold their shape, shine, and flow beautifully from one strand to the next. By afternoon, you're left with a voluminous mane without structure and ends pointing in every direction. It's not that you're doing something fundamentally wrong – wavy and curly hair has a different structure than straight hair and reacts much more sensitively to environmental conditions. Once you understand what exactly breaks down the definition, you can work with it.
Three main factors, closely related, usually contribute to the breakdown of waves:
- Humidity. Wavy hair tends to be drier because sebum spreads less easily along the twisted strand than on a straight one. A dry hair then absorbs moisture from the surroundings, the fiber swells unevenly, cuticle scales lift, and a smooth wave turns into a fluffy tuft. That's why frizz worsens on hot days, in the rain, and in overheated offices.
- Friction against clothing and surfaces. Sweater collars, scarves, chair backs, backpack straps, and cotton pillowcases – every contact mechanically brushes out the wave and disrupts the boundary between individual strands. The lengths and ends, the oldest and most stressed parts of the hair, suffer the most.
- Brushing dry hair. A comb pulled through dry waves separates the strand into individual hairs. The wave itself doesn't disappear, but it loses its outline – instead of a defined strand, a triangular volume forms that won't reconnect during the day.
This leads to one crucial point: stable definition is not a matter of one miracle product, but of layering. It works as a trio of steps, each building on the previous one. First, hydration – a hair saturated with care has no reason to absorb moisture from the air. Then, shaping, the step that unifies the strands and gives them direction while they're still wet. Finally, fixation, which seals the finished shape to last even after drying and throughout the day.
The order is not arbitrary. If you apply a shaping product to overly dry hair, the strands won't unify and the product will sit on the surface like a film. Conversely, if you skip fixation, the definition will last only until the first whiff of humid air. And if you reach for a comb after drying, you'll undo the result you worked on in the morning.
In the following sections, we'll go through four groups of products that cover this trio of steps. It's worth knowing what to expect from each before you start choosing a specific product:
- Gels and mousses – create a thin, flexible layer around the strand that holds the shape even in humidity. Suitable for more pronounced, firmer definition.
- Shaping creams and leave-in treatments – a softer approach that combines hydration and shaping in one step. Waves come out more natural and less "styled".
- Serums, oils, and styling sprays – work on the hair surface, smoothing the cuticle and taming small flyaways that cause most visible frizz.
- Detangling brushes – determine the state in which you start shaping the wave. Gentle detangling in wet hair saves more effort than any product applied on top.
One more thing that affects the result more than expected: the amount of product and the condition of the hair you're applying it to. Fine waves can handle less product than thick curls, porous hair after coloring needs more hydration and less fixation to avoid becoming stiff. A few weeks of experimenting with how much gel or cream your hair truly needs usually does more for definition than changing the entire range. In the following sections, we'll discuss not only what to choose but also how to use it.
Shaping Gels and Mousses for Firm Curl Definition
Not every curl needs the same level of support. If your curls hold their shape for just the first couple of hours after drying and then loosen into an undefined wave, they don't lack hydration but structure—a layer that wraps around the strand after drying and holds it in the shape you've styled it. This is exactly the job of gels and mousses. Their task is not to nourish the hair, but to hold it.
It's worth reaching for them especially if you have finer hair with curls that quickly stretch under their own weight, if you wear longer lengths that pull the curl down, or if light care alone gives you a soft but undefined texture. For very coarse curls, it's usually wiser to start with a lighter option and gradually adjust the firmness to avoid weighing the hair down.
The Gel Shell Principle
Apply gel or mousse to damp, not wet, hair—ideally after squeezing out excess water with a towel. Spread the product in your palms and scrunch it into the strands from the bottom up, so the curl coils into itself. When drying with a diffuser or air drying, a so-called gel shell forms on the surface of the strand: the hair stiffens and feels hard to the touch. This is not a mistake but a desirable intermediate state.
The decisive step is next. Once the hair is completely dry, clasp it in sections in your hands and gently scrunch from the bottom up. The shell will break, the hair will soften, and the curl will remain defined but not stiff. If you loosen it before the hair is dry, the shape will fall apart and all your effort will be wasted.
Gel or Mousse?
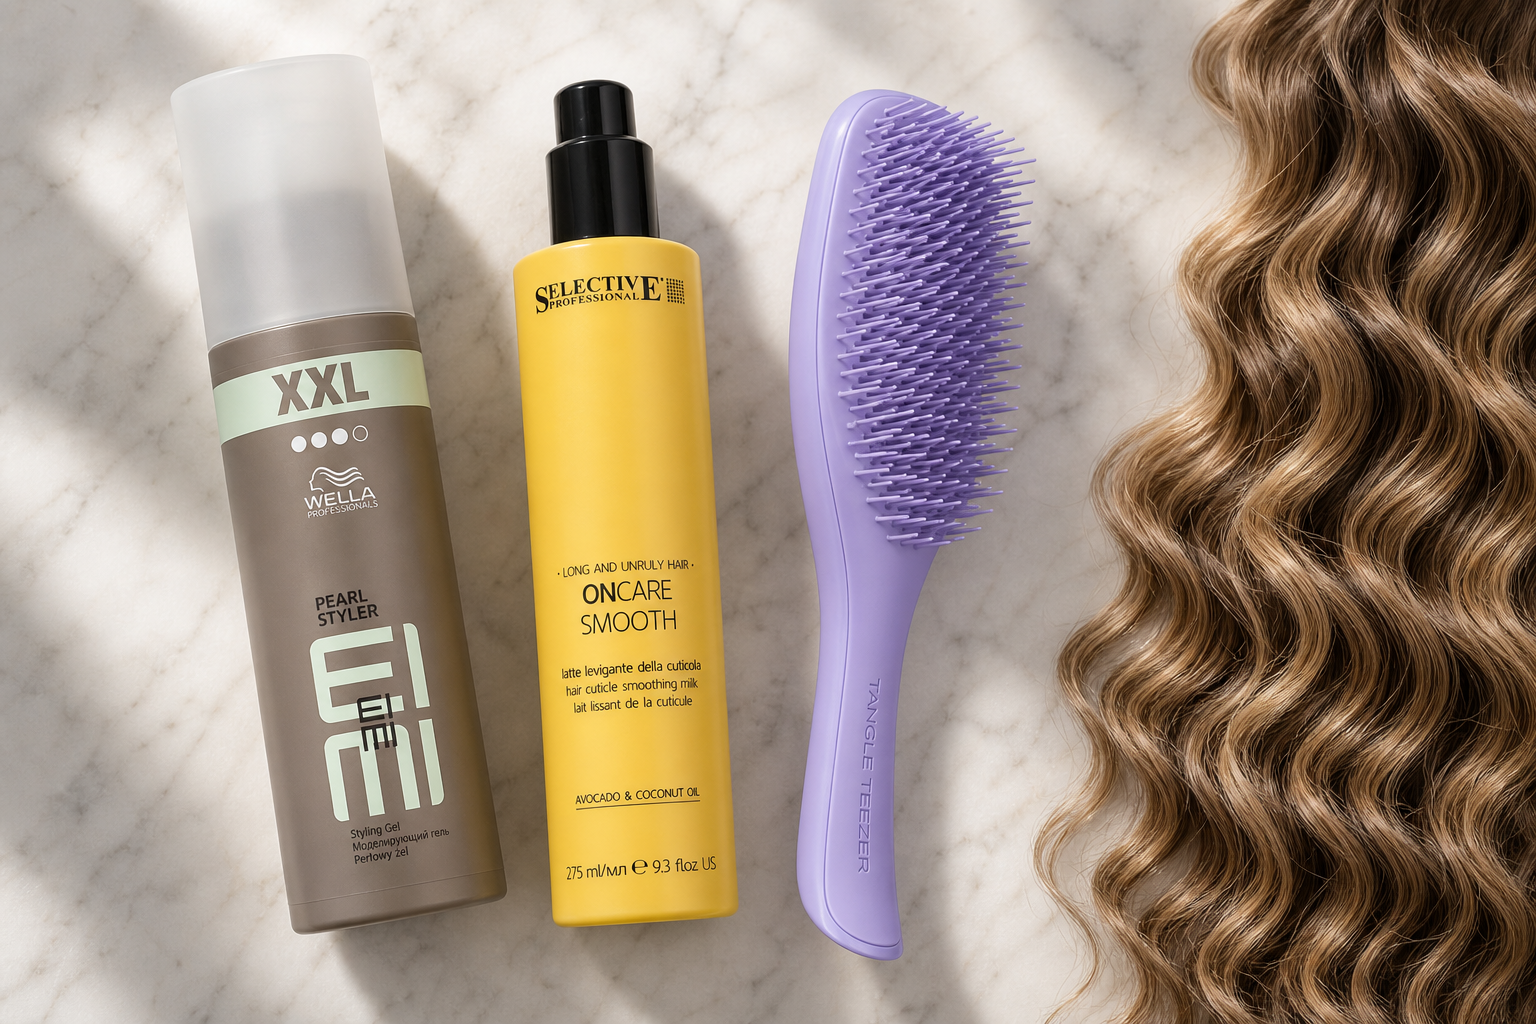
- Wella Professionals EIMI Texture Pearl Styler – a gel from the Hair Gels category, suitable for shorter to medium-length waves and for targeted styling of individual strands. Use it in small amounts and add more as needed; gels generally require less product than it might seem at first glance.
- Alter Ego CureEgo Hydraday Whipped Cream – a mousse with a whipped creamy texture from the Hair Mousses category. It spreads more easily along the lengths than gel and holds noticeably softer, making it more appreciated for longer hair and for those who find gel fixation too hard.
Combining both at once usually doesn't make sense—the hair quickly becomes weighed down and the curl loses its bounce. It's wiser to choose one product and play with the amount until you find the ratio that suits your hair.
Finishing with Hairspray
If the curl holds its shape after styling but gradually softens during the day, finish with a medium to strong hold hairspray. Spray it from a distance of about twenty-five centimeters in short bursts—a continuous spray in one spot will glue the hair together and the definition will be lost. From the professional range, Sebastian Professional Re-Shaper Strong Hold Hairspray or Schwarzkopf Professional Silhouette Super Hold Hairspray are available; both offer strong hold, so for fine waves, a little goes a long way.
You can tell the result is right when the curl returns to shape after shaking your head but remains flexible. If the hair feels sticky or shines unnaturally, reduce next time in this order: first the amount of hairspray, then the amount of gel.
Leave-in Creams and Milks for Softer Waves
Between washing and styling, there's a step that curly hair often skips – leave-in care. Yet, it's this step that determines whether your waves remain flexible and soft or break down into individual strands as they dry. Leave-in creams and milks help retain moisture inside the hair, smooth its surface, and gently bind the strands together. Unlike styling products, they don't create a solid layer on the surface, so your waves stay soft to the touch and can be reshaped with your fingers throughout the day.
Cream or Milk? It Depends on Hair Density
Creams have a thicker, truly creamy texture and contain more nourishing and softening ingredients. They add weight to the hair, preventing neighboring waves from separating and instead merging into a single, cohesive strand with a defined shape. This makes them ideal for thick, coarse, or dry hair, and for waves that tend to fray from the mid-lengths.
Milk is lighter and more fluid, resembling the consistency of cream, and spreads into a very thin layer on the hair. It's usually a better choice for fine hair: it hydrates and smooths without weighing down the roots so much that the wave loses its lift and hangs limply. If your hair feels flat or greasy the day after using a cream, it's usually a sign to switch to milk.
A simple home guide: if your waves break apart and frizz after drying, they lack substance and need a richer cream. Conversely, if they hang without elasticity, there's too much product or weight, and it's worth reducing.
Three Leave-in Products from Our Range
- Milk_Shake Incredible Milk – a lightweight spray milk with a very fine texture. It leaves hair manageable and easy to comb, which is especially appreciated by those with finer waves that a thick cream would weigh down.
- Selective Professional OnCare Smooth Hair Cuticle Smoothing Milk – a milk focused on smoothing the hair cuticle. Opt for this if your main issue is a frizzy, fluffy surface that lifts in humidity.
- Lakmé Lak-2 Instant Hair Conditioner – a leave-in conditioner that takes on more work with detangling and softening the lengths. It's suitable for thicker hair and ends that lack slip after washing.
How to Apply Leave-in Care
Leave-in care should be applied to damp hair, not dry or soaking wet. The ideal state is when the hair is no longer dripping, but the strands are still noticeably damp and hold together – at this point, the product spreads evenly, and the hair absorbs some of the water inside. Divide your hair into sections, spread the product in your palms, and apply from the bottom up, from the ends to about halfway up the length. Be sparing at the roots, as the product only unnecessarily reduces volume there.
Apply less initially and add more if needed, rather than overloading your hair from the start. For medium-length hair, an almond-sized amount of milk is usually sufficient, and slightly less for a thick cream. Then gently scrunch the strands from underneath in your palm towards the scalp – this helps the wave form into a shape that it will hold even after drying.
In the layering order, leave-in care always comes first. Then comes the styling product, which locks in the definition – that's why it's worth spending a few extra minutes on the leave-in step. Let the cream or milk sit briefly to absorb before moving on.
Serums, Oils, and Sprays to Tame Frizz
Gel holds the shape, cream adds softness – but neither seals the hair surface. That’s the job of the final layer. Serums, oils, and styling sprays work on the surface: they smooth the hair cuticle and create a thin barrier that makes it harder for moisture to penetrate. Since moisture is often the main trigger for frizz in curls, the final layer determines how your curls will look at five in the afternoon, not just at eight in the morning.
These three formats are often confused on the shelf, yet each addresses a different part of the problem:
- Serum – the lightest of the trio. It coats the hair with a thin film and smooths the surface without weighing it down. It’s suitable for finer curls that might clump together under heavier products. From our range, Schwarzkopf Professional BC Bonacure Sealed Ends+ Clean Performance is a serum targeted at split ends, where frizz is first noticeable.
- Oil – a richer option that also nourishes the hair. Moroccanoil Treatment Light is a lighter version intended more for lighter and finer hair, while Wella Professionals SP Luxe Oil Reconstructive Elixir combines oils with keratin care and can handle thicker, coarser hair.
- Anti-Frizz Styling Spray – applied to damp hair before drying, and the layer is set with heat. Color Wow Dream Coat Supernatural Spray is designed precisely for this process: spray it throughout the length, spread it, and dry. The advantage is even coverage, which is harder to achieve with an oil dropper.
Choose the Format Based on Hair Thickness
The deciding factor isn’t length, but how thick and porous your hair is. Fine hair can easily clump into strands under oil, losing volume – in such cases, it’s better to start with a serum or spray and reserve oil exclusively for the ends. On the other hand, thicker, colored, or mechanically stressed hair absorbs oil and remains rough to the touch without it. If you’re unsure, observe how your hair looks the next day: an oily root with dry ends usually means you applied the product too high, not that you used too much.
The formats aren’t mutually exclusive. A common combination is to apply spray to damp hair as a base before drying, and then add oil or serum to the dried curls. The reverse order doesn’t work – oil applied first prevents other layers from spreading evenly.
A Diffuser Needs Heat Protection
Drying with a diffuser is practical for curly hair: it doesn’t pull the curl and lets it dry into shape. However, it’s still heat, which affects unprotected hair similarly to a curling iron. Before blow-drying, reach for a product with heat protection – hair cosmetics have a separate category for them, such as the CHI 44 Iron Guard line. Some anti-frizz sprays contain heat protection, while others don’t, so check the label.
Also, keep the diffuser at a lower temperature and higher airflow. A curl that dries more slowly holds its shape longer, and the hair surface remains smoother.
Oil is Measured in Drops, Not Palmfuls
The most common mistake with oils is overuse. Two to three drops are enough for medium-length hair, while for longer and thicker hair, consider four to five. Rub them between your palms, run through the ends and mid-lengths, and only then consider adding another drop. Avoid the roots – oil doesn’t save anything there and just weighs the hair down.
Apply serum similarly cautiously, while spray can handle a more generous application because it’s thinner. And if your curls still fall flat during the day, the solution is not another layer of oil, but a smaller amount divided into two applications.
Detangling Brushes and Building a Daily Routine
Whether you sport soft loose waves or tight curls, the outcome often hinges on the step that occurs before styling itself – detangling. This is where much of the frizz originates, which you then battle with products throughout the day. Therefore, a brush is not just an accessory but a fundamental tool.
Waves hold their shape because the hair strands wrap around each other. Once you run a dry comb through them, the strand breaks into individual hairs, leaving you with fluffy, frizzy volume instead of a defined spiral. In wet hair, the situation is different: water softens the hair, conditioner creates a slippery film on the surface, and the brush bristles glide through without tearing. That's why waves are always detangled in the shower or immediately after, with conditioner applied, working from the ends upwards in smaller sections.
The brand Tangle Teezer offers two formats that suit this method. The Tangle Teezer Wet Detangler is designed specifically for wet hair: it has long flexible bristles that bend within the strand instead of pulling it, and is used with conditioner still in the shower. The Tangle Teezer The Ultimate Detangler is more versatile – it handles both wet and dry hair, is suitable for detangling before washing, and its handle gives you better control. If you're choosing just one, the wet hair variant makes more sense for waves, and it's one of the most affordable items in the entire routine.
Several principles to make detangling a neutral step instead of a source of frizz:
- Divide your hair into three to four sections and work on one at a time, not the whole head at once.
- Work from the bottom up: start with the ends, then the mid-lengths, and finally the roots.
- Hold the strand above the area you're detangling – this way, the pull doesn't reach the scalp.
- Once dry, don't use the brush again. Fix a broken wave more with damp fingers than by detangling.
When you put all the steps together, you get a routine that takes only a few minutes longer than regular washing:
- Wash your hair and apply conditioner. Detangle with a wet hair brush while still in the shower.
- Squeeze the water out of your hair with a microfiber towel or cotton t-shirt. Don't rub.
- Apply a leave-in treatment as the first layer on damp hair.
- Add gel or styling cream and scrunch the waves into your palms towards the roots.
- Dry with a diffuser on a lower temperature, or let your hair air dry. Don't touch it while drying.
- Once your hair is dry, break the gel cast in your palms and add a few drops of serum or oil to the ends.
If you want to assemble a basic trio from the hair care range, start with your hair type and how much you want to invest:
- Fine waves that easily weigh down: Selective Professional OnCare Smooth Hair Cuticle Smoothing Milk as a light leave-in layer, Wella Professionals EIMI Texture Pearl Styler for definition, and Tangle Teezer Wet Detangler. The most affordable of the three combinations listed here.
- Thick and dry curls: Milk_Shake Incredible Milk, creamy mousse Alter Ego CureEgo Hydraday Whipped Cream, and finally Wella Professionals SP Luxe Oil Reconstructive Elixir in drops on the ends.
- Frizz in humid weather as the main issue: Color Wow Dream Coat Supernatural Spray, leave-in Lakmé Lak-2 Instant Hair Conditioner, and Tangle Teezer The Ultimate Detangler for pre-wash detangling.
You don't have to start with all three products at once. Try the brush and leave-in treatment first – for some waves, this duo is enough. If the waves still fall apart, add layers gradually to see which step truly works for you.
Category
Recommended articles
"Give a girl the right shoes and she can conquer the world!" Marilyn Monroe